Dr. Kunal Shah is the Principal of a brand new practice in Hendon, London – LeoDental. With a state-of-the-art CBCT installed, the practice is receiving referrals for implant planning cases. In the second installment of his three-part series, Kunal demonstrates a clinical case study where CBCT scanning was integral for predictable treatment and the very best outcome for the patient.
Background
A female 52-year-old patient was referred to me from a local practice for implant surgery. I had developed a good rapport with the referring dentist, who was looking for mentorship through this case. The patient had had missing teeth for several years (15-20), although this had only recently begun affecting her lifestyle as she had issues eating – the problem was therefore functional rather than aesthetic.
The patient was fit and healthy, with no relevant medical background or allergies, a non-smoker, social drinker, moderate previous dental restorations and generally good oral hygiene. The LL6, LL7 and LR6 were missing, having been extracted many years ago. The adjacent teeth had started to drift and the opposing teeth on the other side were erupting.
The treatment options were discussed with the referring dentist and the patient, which included no treatment, bridges, dentures and implants. The patient wished to proceed with implants and consent was obtained.
Treatment planning
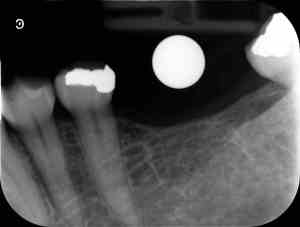
Pre-op periapical X-ray with metal ball for reference
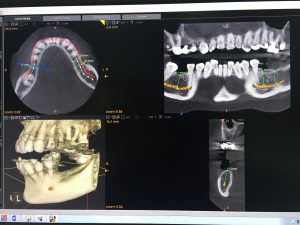
CBCT scan used for implant placement analysis
A periapical X-ray was taken with a ball bearing, as well as a CBCT scan. The first scan enabled us to assess the height of the bone, but the 2D image couldn’t gauge the buccal-lingual aspect or the bone density. The CBCT provided the 3D element, allowing us to track the depth from the crestal bone / bony ridge towards the nerve, assess the mesial-distal width present for placement of the LL6 / LL7 and LR6, the bucco-lingual dimensions as well as account for the biological width. We were then able to calculate the vertical depth and nerve anatomy with high accuracy.
All the scans were evaluated with the referring dentist and together we placed virtual implants on the X-rays. This demonstrated exactly where the implants should be placed, as well as the angulation, platform, length and type of implants required. Impressions were then taken using a single stage wash putty technique and a study model and surgical stent were fabricated with mock acrylic teeth. We were able to practice the surgery on the model, better visualizing the implant position and comparing this to the virtual plan on the CBCT scans. All this serves to improve treatment planning, minimizing the surgery time and the associated risks. From experience, it is clear that the quicker the surgery, the better the primary stability and integration of the implant. From an aesthetic standpoint, quicker surgery also seems to lead to better gingival and mucosal healing, resulting in less future recession. This is prudent as the soft tissue is a key element for good aesthetics and long-term success of the implant.
Treatment provision
At the start of the surgical appointment, the patient was given an opportunity to ask any final questions and the pre-op medications were administered. I always work with the same surgical team – a surgical dental nurse and a second, highly experienced implantologist – so we are very familiar with the workflow, making the procedure as smooth as possible.
The surgery itself was a repeat of the virtual process we’d performed during the planning stage. A flap was raised and the sequence of implant placement was followed according to the manufacturer’s instructions (Nobel Biocare implants in this case). The three implants were placed in the pre-determined sites, healing abutments fitted and the flap closed. The LL7 was very difficult to access, but surgery was simple as we had planned ahead and knew to use the extension elements available with the implant system for this position. The patient was then provided with a post-op kit, which contained further information on caring for the surgical site, maintenance tools and any relevant medication. This was also all explained to the patient and her chaperone.
As the patient had already become accustomed to the spaces in her mouth, there was no need for temporaries in this case, which further encouraged good soft tissue healing with no occlusal load on the implant.
Follow-up
During the review one week after surgery, the patient reported no pain and there were there no problems with the implant site. Three-four months were then allowed for healing, before the patient returned for periapical X-rays, removal of the abutments, intraoral scans to reveal good soft tissue healing and irrigation of the site. An impression was taken using an open-spaced tray (customized for the patient by the lab) with the implant impression copings in place. I work very closely with the technicians at Gola Creations, which I think is important when looking to achieve the very best restorative result.
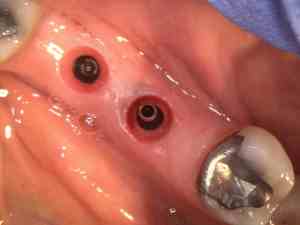
LL6, LL7 and LR6 following ~3-month integration
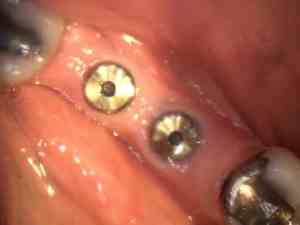
LL6, LL7 and LR6 with healing abutments following ~3-month integration
Another two weeks later, the screw-retained restorations were returned from the lab and fitted. A shade A3 was recorded and an impression of the opposing arch was taken to determine bite.
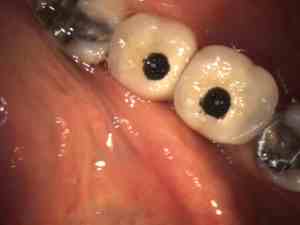
Placement of screw-retained restorations
Outcome
By the end of treatment, the patient was ecstatic with the outcome. From the professional team’s perspective, there were no complications or unexpected events, which can be attributed to both the meticulous planning performed and the harmony with which the team works together.
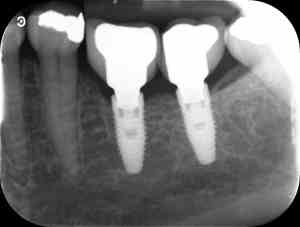
Post-op periapical X-rays
© 2024 Carestream Dental LLC. All Rights Reserved