by Bart W. Silverman, D.M.D., Oral and Maxillofacial Surgery
A few words about implant planning
Accurate diagnosis and proper treatment planning are key when it comes to successful implant placement. A design that begins with the end result in mind is important as well. A well-designed case, in addition to a well-designed provisional, assists the surgeon in optimizing implant position and also allows us to start contouring the emergence profile at implant placement.
The process starts with a cone beam computed tomography (CBCT) scan and a digital impression of the patient’s existing dentition. The objective is to create two files: a DICOM file (the CBCT scan) and the intraoral scan in .STL format. We merge both scans in the Prosthetic-Driven Implant Planning module (of the CS 3D Imaging software). If edentulous spaces are present, then virtual teeth can be placed in the planning software. Using this technology, we can plan the implant position in an ideal location. We can then export the plan or the DICOM and .STL files and fabricate a surgical guide.
In addition to a guide, we can use these digital files to mill a provisional restoration, customized gingival former or healing abutment. This allows us to plan for optimum implant placement and to start esthetically contouring the gingiva during the healing phase. We can start developing the emergence profile of the restoration to mimic that of a natural tooth at the time of implant placement.
The case
A 50-year-old female presented to my office for removal of her previous endodontically treated, non-restorable mandibular right first molar.
The tooth was removed and a socket preservation with MinerOss Cortical Cancellous chips 0.60 – 1.25 mm and a cytoplast membrane was performed. The non-resporpable membrane was removed after one month. After four months of uneventful healing, Carestream Dental technology was used to acquire two scans: a CBCT scan with the CS 9300 and an intraoral scan with the CS 3600. Both files were merged into the Carestream Dental implant planning software.
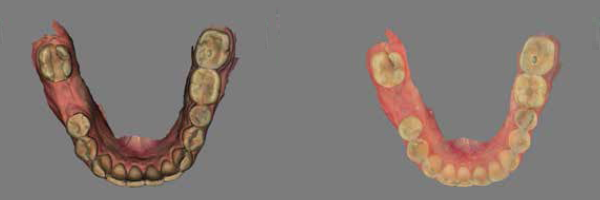
A virtual first molar tooth was placed and a plan for the ideal implant placement was created. The DICOM and .STL files were exported to 360imaging® in Atlanta, and the lab fabricated a surgical guide and a customized gingival former.
The patient was brought into the oral surgical suite and the manufacturer’s surgical protocol was followed to place the BioHorizon Tapered Internal 4.6mm x 10.5mm implant.
An initial ISQ reading of over 68 was obtained using the Ostell machine. The customized preformed milled healing abutment was placed, which allowed for the contouring of the gingival tissues at the time of implant placement.
| Our Family of Brands | ||
 |
 |
|
© 2024 Carestream Dental LLC. All Rights Reserved